Transfer iDevice Data to Computer
How to Transfer iPhone/iPad Data to PC without iTunes
When you use your iPhone and iPad for a while, you can end up accumulating tons of photos, videos, messages, contacts, and other data on the device. Timely backup of device data is to better ensure the security of important data. If your device is damaged, lost or stolen, or otherwise, all of your memory and personal data may be lost.
iOS Data Recovery is a powerful iTunes alternative and iPhone/iPad data recovery tool which can help you recover your data with a few clicks as well as transfer both existing and deleted data from the iOS device to the computer. It supports recovering and transferring iPhone/iPad/iPod photos, videos, contacts, messages, files, APP data, etc.Unlike using iTunes to back up data, using iOS Data Recovery supports preview and selection, that is, before you transfer data, you can view and select the specific data you need to transfer without transferring all the data to the computer. Once transferred to the computer, the data can also be viewed and used freely without restriction. You can extract existing data from your device or recover accidentally deleted data according to your actual needs. Instead of transferring all the data that needs to be backed up or restored together, its recoverable specific data saves you a lot of time and effort.
Now I’m going to show you the detailed steps to backup your iPhone and iPad data to computer selectively.How to Transfer iPhone/iPad Data to Computer Selectively
Step 1. Download and install iOS Data Recovery on your computer
Download the Windows or Mac version of iOS data recovery program on your computer and double-click the icon to install it, finish the setup process, then launch it.


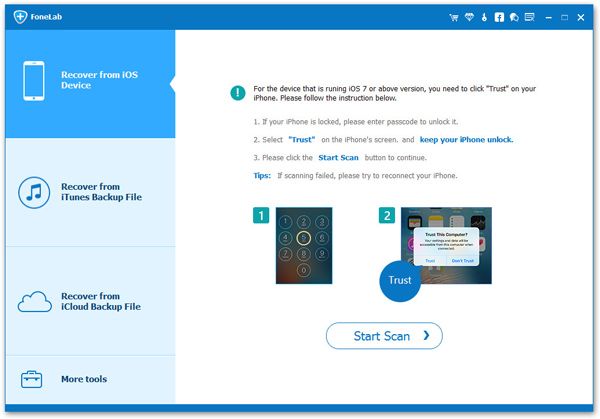
Step 2. Choose recovery mode
On the homepage, you can tap the feature of "iPhone Data Recovery" and the software will go to default mode "Recover from iOS Device". Using a usb cable to link your iPhone/iPad to the computer and press "Trust" on iDevice screen, then the software will detect your device and show it’s interface on the windows, you can see device info like name, serial number, then you can click "Start Scan" button to scan device storage.
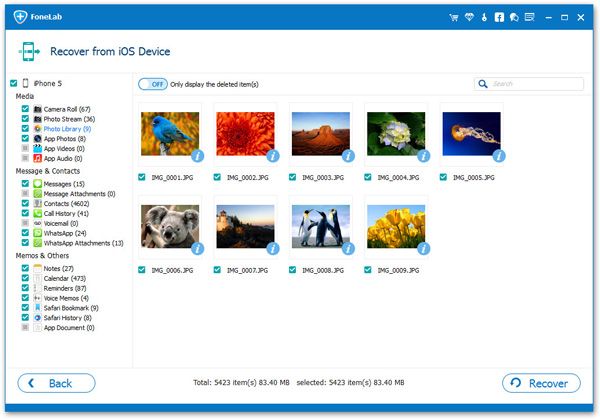
Step 3. View and transfer data you need
The software will scan your device for some time, after scanning, you can see all data type on left panel, including photos, videos, notes, call logs, whatsapp, messages, contacts and more, tap one data type and you can view all related data on the right, including existing and deleted data, choose all data you want to transfer and click "Recover" button to sync them to computer.
- Recover iPhone Data
- Recover iPhone Photos
- Recover iPhone Videos
- Recover iPhone Contacts
- Recover iPhone Text Messages
- Recover iPhone iMessages
- Recover iPhone Notes
- Recover iPhone Call History
- Recover iPhone Calendars
- Recover iPhone Reminders
- Recover iPhone Bookmarks
- Recover iPhone Voicemail
- Recover iPhone Reminders
- Recover iPhone WhatsApp
- Recover iPhone WeChat
- iPhone Stuck at Recovery Mode
- iPhone Stuck at Apple Logo
- Dead iPhone Data Recovery
- Water Damaged iPhone Recovery