Photo Recovery
Photo Recovery
Photo Recovery (Windows)
Easily recover Lost or Deleted Photo, Video, and Music files
-
 Recover all Deleted Photos, Videos and Music Files with ease
-
 Recover Photos from all Cameras, Memory Cards, USB Drives, Hard Drives & Mobile Phones
-
 Preview Recoverable Photos, Music or Videos before saving
-
 Recover deleted photos clicked from any camera like Canon, Fuji, Kodak, Nikon etc.

 Award
Award
Photo Recovery 5.0 is quick, smart and professional Windows software that scans the computer's hard drive and other digital storage media such as Pen Drives, Memory Cards, Digital Cameras etc., to recover lost or deleted photo, audio and video files from them. However, the computer should be able to detect them.
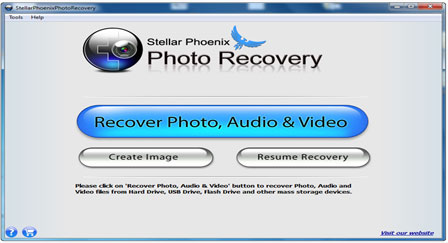
The software has a GUI (Graphical User Interface) that exhibits three options on the resizing home screen i.e. "Recover Photo, Audio & Video", "Create Image", and "Resume Recovery". Recover Photo, Audio & Video options takes the users to a window that contains the logical partitions of the hard drive and the physical drive itself.
You can also scan the complete logical partition at once and save the scanned information as an image (.DAT) file at a desired location. However, the users may also set the region to be scanned by specifying the starting and ending sectors of the hard drive in advance scan option. It also enables the users to scan for selected file types of photo, audio, and video. Create Image option lets the users to create the image (.img) file of a complete as well as of selected region of the logical partitions of the hard drive and save at desired location.
Resume Recovery allows the users to add previously saved scanned information (.DAT) file and start the recovery process. It shows a 3-pane view of the folders containing scanned files. However, the users are given the privilege to exclude undesired files or to recover only selected file types. The right panel of the software shows the preview of scanned files in three views: "Thumbnail view", "List view", and "CoverFlow view". The users can preview the scanned files and then click "Recover" to save them at a desired location. However, it is advised not to save them on the same hard drive partition, from which they are recovered.
Screenshots

 You may be Interested in These Items


