Transfer Notes from iPhone to Mac
How to Transfer Notes from iPhone to Mac
iPhone notes as a personal life assistant for user to mark important things, such as daily schedules, great ideas, appointment, work records, etc. Sometimes you need to transfer your iPhone notes to Mac for backup or view them more convenient. iTunes supports users to back up iPhone notes to computer, but the backup is a kind of SQLITEDB file, which means that it is not visible and you cannot access or read it on your computer directly.
It there any effective way to transfer iPhone notes from iPhone to Mac without iTunes or iCloud? The answer is “Absolutely Yes”! You can rely on iPhone Data Recovery software to manage your iPhone data. This article is going to show you the steps to transfer your iPhone note, you should keep on reading.How to Transfer Notes from iPhone X/8/7/6s to Mac
Transfer notes from iPhone to Mac with iPhone Data Recovery for Mac software, which supports you to directly access or read notes on Mac. iPhone Data Recovery not only can help you transfer your iPhone data to computer, but also supports you to recover deleted data from iPhone/iPad/iPod, including photos, notes, videos, text messages, whatsapp messages, call history and so on. What’s more, it allows you to extract iPhone/iPad/iPod data from iTunes backup and iCloud backup to computer.In this Part, you have three choices: transfer the existing notes; recover and transfer the deleted notes; or transfer both the existing notes and deleted notes from iPhone to Mac. You can choose one of them according to your needs.
Now, let’s download iPhone Data Recovery software on the computer and follow the detailed steps to transfer notes from iPhone to Mac.


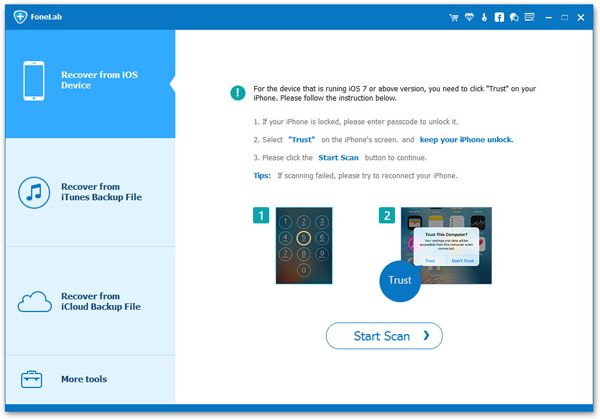
Step 1. Connect iPhone and choose "Recover from iOS Device"
Launch iPhone Data Recovery software on your Mac after install it, and connect your iPhone to Mac with USB cable. From the primary interface, choose the mode of "Recover from iOS Device".
Step 2. Scan Notes from iPhone
Tap "Start Scan" button to allow the program to analyze your iPhone files. From the pop-up window, select "Notes" to scan. In this step, you can select other file type if you need to transfer other data to your Mac.

Step 3. Preview and Transfer iPhone notes
When the scanning process is finished, all the notes on iPhone will be listed in categories. You can click "Notes" on the left side of the window to check them in detail.Note: You can tap the option of "Only display the deleted item(s)" to choose whether you only want to view your deleted notes.
Select the notes which you want to transfer, and them click the "Recover" button to transfer and save them on your Mac.

iPhone Data Recovery
- Recover iPhone Data
- Recover iPhone Photos
- Recover iPhone Videos
- Recover iPhone Contacts
- Recover iPhone Text Messages
- Recover iPhone iMessages
- Recover iPhone Notes
- Recover iPhone Call History
- Recover iPhone Calendars
- Recover iPhone Reminders
- Recover iPhone Bookmarks
- Recover iPhone Voicemail
- Recover iPhone Reminders
- Recover iPhone WhatsApp
- Recover iPhone WeChat
- iPhone Stuck at Recovery Mode
- iPhone Stuck at Apple Logo
- Dead iPhone Data Recovery
- Water Damaged iPhone Recovery